
Wondering how to disinfect kitchen appliances without harsh chemicals? The two-bottle vinegar and hydrogen peroxide method kills germs better than bleach.
The eco way to disinfect kitchen appliances is to spray white vinegar first, then follow with 3% hydrogen peroxide from a separate bottle.
This sequential method, developed by Virginia Tech food scientist Susan Sumner and first reported in Science News in 1998, kills Salmonella, Shigella, and E. coli more effectively than chlorine bleach.
But here’s the honest part most articles skip: for everyday cleaning, you don’t need to disinfect at all. Cleaning with soap and hot water handles the daily work.
Full disinfection is for specific moments, after raw meat, illness in the house, or bringing home a secondhand appliance. Here’s exactly how to do it, and how to know which appliance needs what.
When I first started paying attention to what leaves my kitchen sink, I couldn’t stop thinking about where it all goes.
Most conventional disinfectant sprays are heavy in chlorine or quaternary ammonium, and every wipe-down eventually runs down the drain and into the water system.
That’s what pulled me into researching whether there was a way to actually kill germs without dumping that into rivers. Turns out, there is.
Key Takeaways
- Spray vinegar first, then 3% hydrogen peroxide from a separate bottle. Never mix them in one container.
- Cleaning with soap and hot water handles daily kitchen work. Save full disinfection for raw meat, illness, or a secondhand appliance.
- Baking soda and vinegar don’t disinfect. The fizz is just neutralization, not germ-killing.
- 3% hydrogen peroxide alone is a food-safe disinfectant with a one-minute wet contact time.
- Bleach is still the right tool for sewage backup, C. diff, or MRSA. For everything else, the eco method works.
Clean vs. Sanitize vs. Disinfect: What Actually Matters in a Kitchen
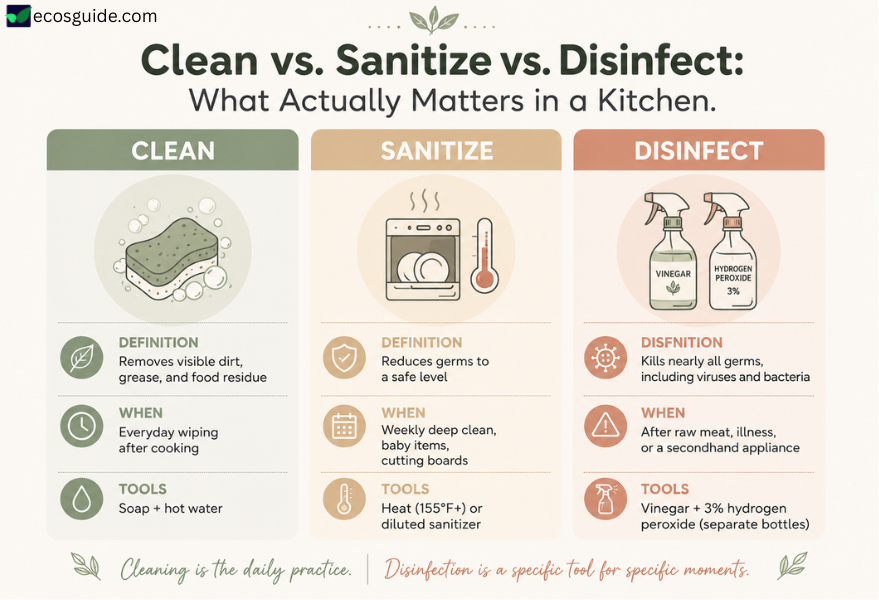
Cleaning removes visible dirt, sanitizing kills a high percentage of germs on a surface, and disinfecting kills nearly all germs, including viruses and bacteria, on hard surfaces.
All three sound similar, but they’re not the same job. Most kitchens don’t need all three every day.
Here’s the practical way to think about it: cleaning is a prerequisite for both sanitizing and disinfecting. You can’t skip it.
Grease and food residue physically block the disinfectant from touching the germs underneath, whether you use bleach, vinegar and peroxide, or a ready-made spray.
When each one is actually needed
For most everyday moments, cleaning is all you need. Wiping down the counter after chopping vegetables. Rinsing your coffee mug. Washing the blender jar with dish soap after a smoothie.
If nothing raw and risky touched the surface, and no one in the house is sick, soap and hot water do the job.
Sanitize after handling produce on a cutting board, when you’re preparing food for a baby or someone immunocompromised, and for the weekly deep clean of high-touch appliances like the coffee maker and blender.
Full disinfection is for specific moments. After raw meat, poultry, or eggs have touched a surface. During or after illness in the household. Mold in the coffee maker reservoir. A secondhand appliance you just brought home. After a flood or power outage that thawed your fridge.
These are the times when going one step further genuinely matters, and this is where the eco method earns its place.
Over-disinfecting has an environmental cost too, and it isn’t necessary for a healthy home. That’s the piece most cleaning content skips.
The Eco Method That Kills Germs Better Than Bleach
In 1998, Virginia Tech food scientist Susan Sumner published research in Science News showing that spraying white vinegar followed by 3% hydrogen peroxide, from two separate bottles, killed Salmonella, Shigella, and E. coli more effectively than chlorine bleach or any commercially available kitchen cleaner.
The catch is in the phrase “separate bottles.” The method only works when the two are sprayed sequentially, one after the other, not mixed.
The Virginia Tech research that changed how I clean
Sumner’s method uses two ingredients you likely already have. Plain white distilled vinegar at the 5% acidity you get at any grocery store.
And 3% hydrogen peroxide, the same brown-bottle drugstore version you’d use to clean a scrape. Each goes into its own spray bottle.
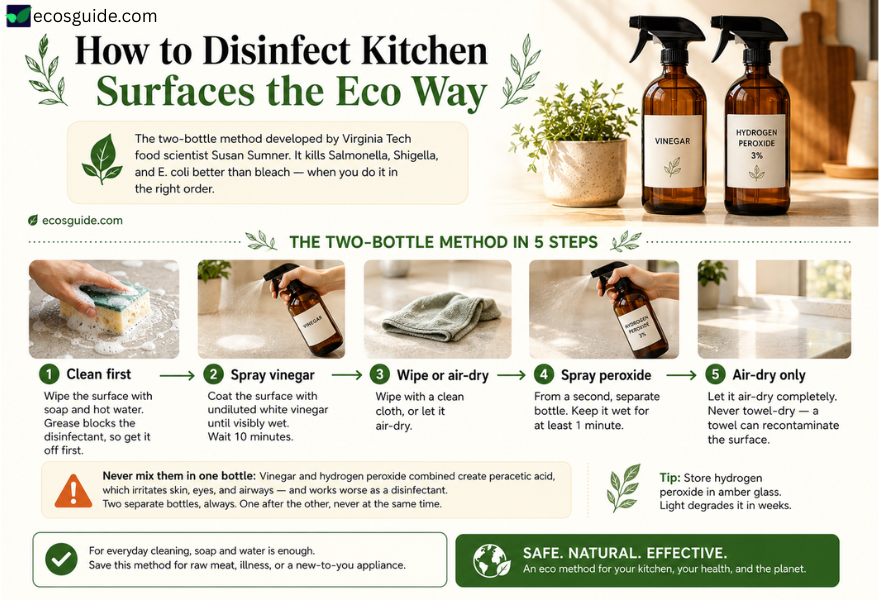
You clean the surface with soap and water first, then spray vinegar and let it sit ten minutes, then spray hydrogen peroxide from the second bottle and let it sit at least one minute before air-drying.
In her original research, Sumner found that used in tandem, the two are about ten times more effective at killing bacteria than either one used alone, and dramatically more effective than combining them in the same bottle. That combination point matters.
Why they must stay in separate bottles
When vinegar and hydrogen peroxide are mixed in the same container, they react to form peracetic acid, which is less effective as a disinfectant and irritates skin, eyes, and airways.
This is the peracetic acid warning, and it’s the reason the University of Maine Extension explicitly tells home cooks not to mix them.
One spray, then the other. From separate bottles. Never combined in advance.
Step-by-step: how I actually use the two-bottle method
Here’s my routine, and I’ve used it in my own kitchen for years:
- Clean the surface first with soap and hot water. If there’s grease, get it off. Grease blocks the disinfectant from making contact.
- Spray the surface with undiluted white vinegar until it looks visibly wet. Wait ten minutes.
- Wipe with a clean cloth or let air-dry.
- Spray 3% hydrogen peroxide from a second, separate bottle. Wait at least one minute of wet contact time.
- Let the surface air-dry. Do not towel-dry. A towel can recontaminate the surface with whatever germs are on it.
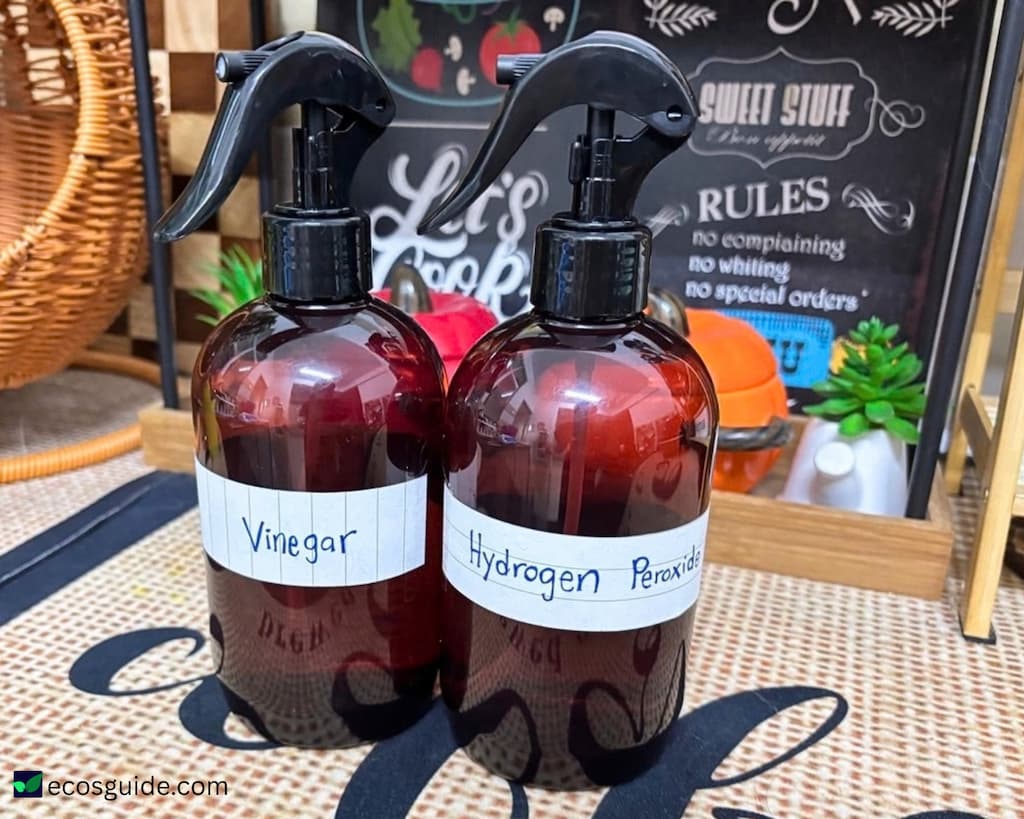
I keep the hydrogen peroxide in amber glass spray bottles because light degrades it (this is why the drugstore version comes in a dark brown plastic bottle in the first place).
Amber glass keeps it fresh for weeks. Label both bottles clearly so they never get mixed up.
What this method works on, and where it doesn’t
The two-bottle method works on sealed hard surfaces: plastic, glass, most metal, laminate, and painted or sealed wood.
Skip it on natural stone counters (the vinegar will etch marble and granite over time), unsealed wood, and aluminum.
Hydrogen peroxide breaks down into water and oxygen, so it leaves no residue on the surface or in your drain. That’s the piece that matters to me.
Wait, Doesn’t Baking Soda + Vinegar Disinfect? (The Honest Answer)
Short answer: no.
Baking soda and vinegar do not disinfect kitchen surfaces when combined. The acid and base neutralize each other, producing water, sodium acetate, and carbon dioxide (the fizz), none of which has meaningful antimicrobial action.
I believed this myth myself before I looked into the research. The fizz feels productive. It looks like something is happening. Something is happening chemically. It’s just not something useful for killing germs.
The chemistry, in plain English
Baking soda is a base (sodium bicarbonate). Vinegar is an acid (acetic acid). When you combine them, they neutralize each other. What you’re left with is essentially saltwater and a puff of carbon dioxide. Neither of those kills germs at any meaningful rate.
If the goal is disinfection, you’ve spent both ingredients and gotten close to nothing back.
What each ingredient actually does well
Baking soda is genuinely useful. It’s a mild abrasive for scrubbing stuck-on grime, and it absorbs odors from fridges, cutting boards, and closed appliances.
If you’d like the full breakdown of what baking soda actually does well, I’ve written a whole piece on it.
Vinegar cuts grease, dissolves mineral deposits and hard-water buildup, and it’s the first half of the Sumner disinfection method.
Neither one is a disinfectant on its own. But both have real, specific cleaning jobs where they earn their place. The reason the myth persists is that the fizz looks like a chemistry experiment. It just isn’t the one you need for germs.
Other Eco Disinfection Methods Worth Knowing
The two-bottle method is my default, but it isn’t the only eco-defensible way to disinfect. Some people prefer heat because it’s chemical-free.
Some want a ready-made bottle they can buy once and use. Here are the other options worth knowing.
1. Heat and steam: free, chemical-free, and underused
The dishwasher’s sanitize cycle reaches at least 155°F (68°C) with a heated dry stage, which is hot enough to kill most household bacteria without any added chemical disinfectant.
If your dishwasher has a sanitize setting, use it for baby bottles, cutting boards, and anything that touched raw meat.
Other heat methods: boiling water for utensils and small metal items (ten minutes at a rolling boil), and a microwaved wet sponge (two minutes on high, and it must be wet or it can catch fire).
Heat is the most eco option because there’s nothing to buy and nothing to run down the drain. It’s just underused because it’s harder to apply to a countertop.
2. 3% hydrogen peroxide on its own
You can use hydrogen peroxide by itself, without the vinegar step, and it still works as a disinfectant.
It’s EPA-recognized as an effective disinfectant against both enveloped and non-enveloped viruses with a minimum wet contact time of one minute.
You spray, you wait sixty seconds while the surface stays visibly wet, and then you air-dry.
This is my go-to for a quick disinfection of cutting boards, the sink, and food-contact surfaces when I don’t have time for the full two-step method. It breaks down into water and oxygen, so nothing lingers.
3. Thymol-based sprays
Thymol, a natural compound derived from thyme oil, is the EPA-registered active ingredient in Seventh Generation Disinfecting Multi-Surface Cleaner.
It’s effective against a range of household bacteria and viruses on hard non-porous surfaces, without the harsh fumes of chlorine or the residue you’d rather not leave on food-contact surfaces.
How to Disinfect Each Kitchen Appliance (Step by Step)
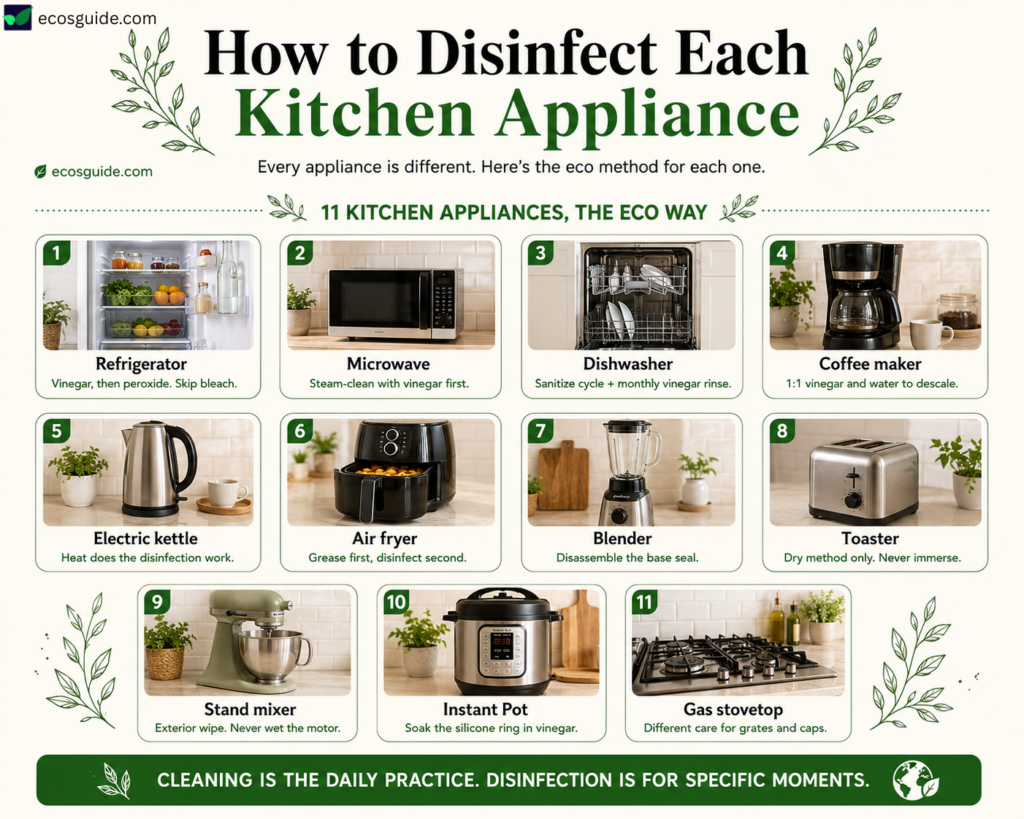
Every appliance has quirks. What works on a fridge shelf can damage an electric kettle. What sanitizes a dishwasher is different from what disinfects a coffee maker.
I use my electric kettle, air fryer, and gas stove every day, so those are the sections I can speak to from my own kitchen.
For the rest, I’ve followed manufacturer guidance and food safety sources.
Refrigerator
Empty the shelves and drawers. Wipe everything with soap and hot water first. Dry. Spray vinegar on the interior hard surfaces, wait ten minutes, wipe. Spray 3% hydrogen peroxide, wait one minute, air-dry.
The door seal is the mold hotspot. Use an old toothbrush dipped in vinegar to get into the folds. Never spray bleach inside a fridge, the residue affects food and no amount of rinsing fully removes it.
If you’re worried about the cloth you’re wiping with, here’s how to actually clean a microfiber cloth so it doesn’t carry germs back onto surfaces.
Microwave
Steam-clean first: bowl of water with a splash of vinegar, run three minutes, then wipe. This handles most everyday cleaning. If you’re disinfecting after a raw egg spill or a meat leak, spray 3% hydrogen peroxide on the already-wiped surface and wait one minute before drying.
Dishwasher
The dishwasher’s sanitize cycle handles most of the germ-killing work. For odor, mineral buildup, and monthly maintenance, the University of Illinois Extension recommends running a vinegar cycle followed by a separate baking soda cycle, not combined.
Two cups of white vinegar in a measuring cup on the top rack, run a normal cycle with heated dry. Then one cup of baking soda sprinkled on the bottom, run a second short hot cycle. The door gasket is the mold hotspot and needs manual wiping.
I wash my dishes by hand and don’t own a dishwasher, so this section follows the University of Illinois Extension guidance.
If you do run one, an eco dishwasher detergent is worth choosing, because whatever is in it goes down the drain after every load.
Coffee maker
I don’t own a coffee maker, so this section follows standard descaling guidance rather than my own kitchen.
Check your manufacturer’s manual first, especially before using hydrogen peroxide in the reservoir.
Descale with a 1:1 mix of vinegar and water through a full brew cycle, then run two cycles of just water to rinse. If there’s visible mold in the reservoir, fill it with a 1:1 hydrogen peroxide and water solution, let it sit for ten minutes, then rinse thoroughly.
Electric kettle
Heat is doing most of the disinfection work here. For descaling, fill with 1:1 vinegar and water, bring to a boil, discard, then boil plain water two more times to rinse. Do not spray hydrogen peroxide inside a kettle. The heat destabilizes it and there’s no benefit.
Air fryer
Grease first, disinfect second is the rule, because grease physically blocks the disinfectant from reaching the surface. Soak the basket in soap and hot water, scrub with a bamboo brush. Wipe the interior with a damp cloth dipped in vinegar, then a second cloth dampened with hydrogen peroxide. Air-dry with the door open. Never immerse the heating element.
Blender
The base seal is the germ hotspot. Food residue collects there and stays wet, which is exactly the environment germs like. Disassemble the base, soak the seals and blade assembly in soap and hot water, then spray all the disassembled pieces with hydrogen peroxide and let them air-dry completely before reassembly.
Toaster (dry-only method)
Never immerse electrical components of a toaster, stand mixer, or other plug-in appliance in water or any liquid disinfectant. Unplug, empty the crumb tray, tap it upside-down over the sink. Wipe the exterior with a hydrogen peroxide-dampened cloth. Never wet the interior heating elements.
Stand mixer or hand mixer
Attachments (beater, whisk, dough hook) are dishwasher-safe for most models. Hand-wash coated attachments. Wipe the head and body with a damp cloth. If disinfecting, use a hydrogen peroxide-dampened cloth on the exterior only. Never wet the motor housing.
Instant Pot / pressure cooker
Silicone gaskets, seals, and rings on appliances like the Instant Pot, blender base, and refrigerator door harbor food residue and moisture, making them the parts most in need of routine sanitization.
The silicone sealing ring is the differentiator. Soak it in a 1:1 vinegar and water solution for thirty minutes. For lingering odors, coat it in baking soda paste and leave overnight, then rinse. The inner pot goes in the dishwasher’s sanitize cycle.
Gas stovetop
Grates, burner caps, and the drip tray each need different treatments depending on the finish. I’ve written a full guide on how to clean a gas stove top with the eco method, which walks through each part.
When You Should Just Use Bleach (Being Honest About It)
I won’t pretend eco methods handle every situation. Some don’t. Here are the times when bleach is genuinely the right call, and it’s an informed choice, not a failure:
- Post-flood or sewer backup contamination
- Confirmed C. diff or MRSA exposure at home
- An immunocompromised household member with a doctor’s recommendation
- A confirmed salmonella outbreak, when public health guidance calls for it
If you’re going to use it, use it correctly. Chlorine bleach is only effective when used unscented, in cool water (not hot), at the correct dilution: 1 tablespoon per gallon of water for general sanitizing, or ¼ cup per gallon for disinfecting hard surfaces.
One thing worth knowing: fragranced or scented bleaches sold in supermarkets are not effective sanitizers.
The fragrance formulation prevents the disinfectant action, which means the “lemon-scented bleach” people reach for at the store is actually the wrong tool for the disinfection they think they’re doing.
The reason I still prefer the eco methods for the other 95% of the time is what bleach leaves behind.
Chlorine byproducts run down the drain and end up in the water system, and they don’t break down cleanly. For high-stakes moments where the eco method genuinely isn’t enough, bleach makes sense. For a Tuesday counter wipe, it doesn’t.
Ready-to-Use Eco Disinfectants (If DIY Isn’t Your Style)
Not everyone wants two spray bottles on the counter. If you’d rather buy a ready-made eco disinfectant, here’s what to look for: an EPA-registered active ingredient (thymol, hydrogen peroxide, hypochlorous acid, or citric acid), no synthetic fragrance, ideally food-contact safe without rinsing, and recyclable or refillable packaging.
The two I’d point to are Seventh Generation Disinfecting Multi-Surface Cleaner, which is thymol-based, EPA-registered, and available in most US grocery stores and on Amazon, and the Force of Nature Starter Kit, which makes its own hypochlorous acid at home from a small capsule of salt, water, and vinegar.
I haven’t tested every ready-to-use eco disinfectant in my own kitchen. I use the two-bottle method most days.
But based on EPA registration, ingredient lists, and reviews from eco-minded buyers, these are the two I’d recommend to a friend.
How Often Should You Disinfect Each Appliance?
Routine cleaning is often, full disinfection is rare. Here’s a realistic schedule.
Kitchen Appliance Disinfection Schedule
| Appliance | Routine cleaning | Full disinfection |
| Refrigerator | Weekly wipe-down | Every 3 months, plus after any raw meat spill |
| Microwave | Every 1 to 2 weeks | Monthly, or after a raw egg or meat spill |
| Dishwasher | Rinse filter after every load | Monthly (vinegar + baking soda cycles) |
| Coffee maker | Rinse after every use | Monthly descale |
| Electric kettle | Rinse weekly | Monthly descale |
| Air fryer | After every use | Weekly deep clean |
| Blender | After every use | Weekly base and gasket clean |
| Toaster | Empty crumb tray weekly | Monthly exterior wipe |
| Instant Pot | After every use | Silicone ring monthly |
Regardless of schedule, disinfect after: raw meat, poultry, or eggs on the counter or in the appliance; illness in the household; a secondhand or thrifted appliance on first use; or a power outage that thawed the fridge or freezer.
Over-disinfecting isn’t just unnecessary, it has an environmental cost. Cleaning is the daily practice. Disinfection is a specific tool for specific moments.
Final Thought
The two-bottle method works. Cleaning is enough most days. Disinfection is a specific tool for specific moments, and knowing the difference is the part most cleaning content skips.
What leaves the kitchen sink has to go somewhere. That’s the thought I keep coming back to whenever I’m reaching for a spray.
I don’t need my kitchen to be sterile. I need it to be safe for the people I feed, and I need to feel okay about what runs off my counter and into the water system. Vinegar, hydrogen peroxide, and a bit of heat handle that most of the time.
Small choices in the kitchen matter, not because they save the world, but because they’re the ones you have direct control over.
- Clean vs. Sanitize vs. Disinfect: What Actually Matters in a Kitchen
- The Eco Method That Kills Germs Better Than Bleach
- Wait, Doesn’t Baking Soda + Vinegar Disinfect? (The Honest Answer)
- Other Eco Disinfection Methods Worth Knowing
- How to Disinfect Each Kitchen Appliance (Step by Step)
- When You Should Just Use Bleach (Being Honest About It)
- Ready-to-Use Eco Disinfectants (If DIY Isn’t Your Style)
- How Often Should You Disinfect Each Appliance?
- Final Thought
- Frequently Asked Questions
Find More Tips At:


Frequently Asked Questions
Can I use hand sanitizer to disinfect kitchen surfaces?
No. Hand sanitizer is formulated for skin, not surfaces. It leaves a residue that isn’t food-safe, and the alcohol evaporates too quickly to give the contact time needed to kill germs on a hard surface. Use 3% hydrogen peroxide or an EPA-registered kitchen disinfectant instead.
Does vinegar actually disinfect on its own?
Vinegar has some antimicrobial activity and can kill some bacteria on some surfaces, but it is not a registered disinfectant and does not reliably kill norovirus, C. diff, or MRSA. For real disinfection, follow vinegar with 3% hydrogen peroxide from a separate bottle, or use an EPA-registered eco disinfectant. Vinegar alone is a cleaner, not a disinfectant.
Is 3% hydrogen peroxide safe on food-contact surfaces?
Yes. 3% hydrogen peroxide breaks down into water and oxygen, leaving no residue, which is why it’s considered safe for cutting boards, countertops, sink surfaces, and the interior of most kitchen appliances. Air-dry after use rather than towel-drying, because a towel can recontaminate the surface with whatever germs are on it.
Does the dishwasher actually sanitize dishes?
Yes, if your dishwasher has a sanitize cycle that reaches at least 155°F with a heated dry stage. This is hot enough to kill most household bacteria without any added chemical. The heated dry stage is the part that completes the sanitization, so air-drying alone with the door open is not the same thing.
Can I use vinegar on stainless steel appliances?
Yes, on the interior or on stainless-steel surfaces designed to handle it. Wipe vinegar off within a few minutes rather than letting it sit on decorative or brushed exterior stainless, because prolonged contact can dull the finish. Never use vinegar on natural stone counters or unsealed wood, since the acid etches stone and soaks into raw wood.
How long does hydrogen peroxide need to sit on a surface to disinfect it?
At least one minute of wet contact time. If the surface dries in under a minute, spray a second coat to keep it visibly wet for the full sixty seconds. For high-risk contamination like raw poultry or illness in the house, leave the peroxide for a full five minutes before air-drying.
