Wooden kitchen utensils have made a serious comeback in eco-conscious kitchens everywhere, and honestly, I get why.
They’re gentle on your cookware, naturally antibacterial, and they don’t conduct heat like metal spoons do. Plus, there’s something satisfying about cooking with tools that feel connected to traditional culinary practices.

But here’s where most people mess up—they toss their beautiful wooden spoons and cutting boards straight into the dishwasher.
I’ve watched friends ruin gorgeous utensils this way, and it breaks my heart every time.
The high heat and harsh detergents can crack, warp, and strip the wood of its natural oils.
If you’ve ever wondered how to clean wooden kitchen utensils properly without damaging them, this guide is for you.
I’m going to walk you through the gentle yet effective methods that’ll keep your wooden tools hygienic, beautiful, and lasting for years to come.
Ready to give your wooden utensils the care they deserve? Let’s dive in and learn the simple techniques that make all the difference.
Why Wooden Utensils Need Special Care

Before we get into cleaning, here’s why wooden kitchen utensils need special care.
Here’s the thing about wood—it’s alive in a way that plastic and stainless steel just aren’t.
Wood is naturally porous and absorbent, which means it soaks up water, oils, and flavors like a sponge.
That’s why you can’t just scrub it with harsh detergents or blast it with hot water like you would a metal spatula.
I learned this the hard way when I first started cooking.
Wood is sensitive to extreme temperatures and prolonged moisture exposure, which can cause cracking, warping, and even bacterial growth if not handled properly.
But here’s why they’re worth the extra effort: wooden utensils are incredibly eco-friendly, they protect your non-stick pans from scratches, and they won’t conduct heat and burn your hands.
Key Takeaways
- Wood is porous and absorbent, so it soaks up water, oils, and food flavors.
- Avoid harsh cleaners and hot water, as they can damage the wood.
- Too much moisture or heat can cause wood to crack, warp, or grow bacteria.
- Wooden utensils are eco-friendly, gentle on non-stick pans, and don’t get hot in your hand.

WHERE SHOULD I SEND YOUR FREE CHEATGUIDE?
Products Needed for Cleaning

For Regular Cleaning
- Baking Soda
- Lemon Juice
- Warm Water
- Clean Towel
For Deep Cleaning and Deodorizing
- Warm Water
- White Vinegar
- Coconut Oil
Step-by-Step: How to Clean Wooden Kitchen Utensils Safely
Alright, let’s get to the good stuff. This is my go-to cleaning method that uses ingredients you probably already have in your kitchen.
No harsh chemicals, no fancy products—just simple, natural cleaning that actually works.

a) The Daily Clean (Your New Best Friend):
- Sprinkle baking soda generously over your dirty utensils. Don’t be shy here—you want good coverage.
- Cut a lemon in half and dip the cut side right into that baking soda. It’s like nature’s scrub brush, but way better.
- Scrub gently with the lemon. The citric acid cuts through grease while the baking soda tackles stains and odors. I love watching stubborn garlic smells just disappear.
- Let them sit for 5-10 minutes. This is when the magic happens. Go grab a coffee—you’ve earned it.
- Rinse with warm water. Not hot! Remember what we talked about with heat damage.
- Pat dry immediately with a clean towel. Get as much moisture off as possible.
- Air-dry completely before storing. This is non-negotiable.
Pro tip: Store them upright in a utensil crock or wide bin instead of tossing them in a drawer. Air circulation prevents that musty smell and keeps mildew away.
b) Deep Cleaning and Deodorizing (Your Monthly Reset)
Once a month, your wooden utensils need a little extra love. Think of it as a spa day for your kitchen tools.
Here’s my monthly routine:
1. Start by soaking them in warm water with a splash of white vinegar for about 20 minutes. The vinegar naturally disinfects without being harsh on the wood. I usually do this while I’m cooking dinner—multitasking at its finest.
2. After soaking, rinse and air-dry them completely. And I mean completely. Any lingering moisture will mess up the next step.
3. Now comes the conditioning part. Apply a thin layer of food-grade oil—I personally love coconut oil because it’s antimicrobial, but walnut oil and food-grade linseed oil work great too.
Just avoid anything that’ll go rancid like olive or vegetable oil.
4. Let the oil soak in overnight. Your utensils will drink it up like they’ve been wandering the desert.
This monthly ritual prevents splitting, warping, and bacterial growth.
It’s also what keeps that smooth, satiny finish that makes wooden utensils so pleasant to use.
Trust me, once you start doing this regularly, you’ll notice the difference immediately.
Key Takeaways
- Soak wooden utensils in warm water with a splash of white vinegar for 20 minutes.
- Rinse and air-dry completely to avoid trapped moisture.
- Apply a thin layer of food-grade oil (like coconut or walnut oil). Avoid oils that go rancid.
- Let it soak overnight so the wood absorbs the oil fully.
See It in Action
Curious how it’s done? Check out my step-by-step video and watch wooden utensils get completely refreshed using everyday kitchen ingredients.
Follow along as I guide you through the simple process to make your wooden tools look brand new.
Hit play and let’s clean like a pro—together!

Common Mistakes to Avoid
Trust me, I’ve made every single one of these mistakes. And each time, I watched perfectly good wooden utensils turn into sad, cracked versions of their former selves.
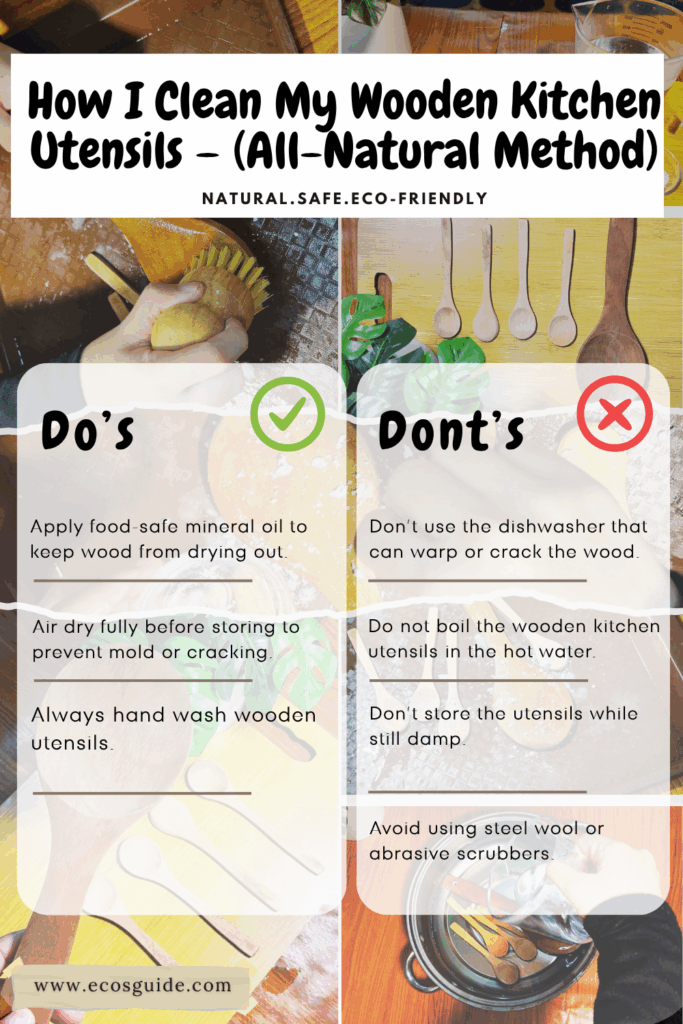
1. Tossing them in the dishwasher is mistake number one.
I get it—it’s so tempting to just throw everything in there and call it a day.
But that intense heat and prolonged water exposure will crack and warp your utensils faster than you can say “eco-friendly.”
I learned this after ruining my favorite wooden spoon set in one wash cycle.
2. Boiling them in hot water seems logical for sanitizing, right?
Wrong. This strips away all the natural oils that keep wood flexible and healthy.
You’ll end up with brittle, splinter-prone utensils that feel rough and look terrible.
3. Using the wrong oils for conditioning is another trap.
I used to grab whatever oil was handy—usually olive oil. Big mistake.
These oils go rancid and create that awful, funky smell that no amount of washing can fix.
4. Not drying them properly.
This is the sneaky mistake that gets everyone. You wash them carefully, then leave them in a damp pile or standing in water.
Hello, mold and mildew. I’ve had to throw away utensils because of this lazy habit.
How to Maintain and Store
Maintenance is where the real magic happens. It’s not just about cleaning—it’s about keeping your wooden utensils in peak condition for years to come.
1. Oil them like clockwork.
I oil mine at least twice a year, but if you’re like me and use them constantly, bump it up to monthly.
It sounds like a lot, but it takes maybe five minutes and saves you from having to replace cracked, dried-out utensils.
2. Choose your oil wisely.
Stick with seed oils like walnut or flaxseed, or go with food-grade mineral oil.
I keep a small bottle of walnut oil just for this purpose. Never, ever use olive or vegetable oil—I can’t stress this enough.
They’ll turn rancid and make your utensils smell awful.
3. Dry them completely every single time.
I know I keep harping on this, but moisture is wood’s worst enemy. After washing, I immediately towel them off and set them upright to air dry.
No shortcuts here.
4. Give them breathing room.
Store your utensils in a dry, open space where air can circulate.
I use a ceramic crock on my counter—it looks good and keeps everything accessible. Stuffing them in a damp drawer is basically asking for trouble.
5. Don’t panic about patina.
Patina refers to the natural, aged finish or surface layer of wooden utensils that develops over time with regular use and care.
Over time, you’ll notice the tips getting darker and developing what looks like staining.
That’s just oxidation, and it’s completely normal. It doesn’t mean they’re dirty or unsafe—it’s just wood aging gracefully. Some of my oldest utensils have this beautiful, rich patina that tells the story of countless meals.
The key is consistency. Treat your wooden utensils with respect, and they’ll be your kitchen companions for decades.
Bonus Tips for New Wooden Utensils
Got a fresh set of wooden utensils? Lucky you! Here’s how to give them the best possible start:
1. Start with a gentle soak.
Give new utensils a 5-minute warm water bath (not hot!).
This helps open up the wood fibers just enough to accept conditioning oil later.
2. Wait a few days before the first oil treatment.
I know you’re excited to pamper them, but let them settle in first.
After 2-3 days of normal use, apply rapeseed or sunflower oil for that first conditioning session.
3. Stick to the twice-yearly routine.
Once you’ve done that initial oiling, keep up with the regular maintenance schedule.
New utensils are eager to soak up that nourishment.
4. Enjoy watching them develop character.
Fresh wooden utensils will stay shiny, smooth, and beautifully protected when you follow these steps.
There’s something really satisfying about watching them develop that gorgeous, well-cared-for patina over time.
When to Replace Your Wooden Utensils

Even with the best care in the world, wooden utensils don’t last forever.
The good news is that with proper maintenance, quality wooden utensils can serve you well for about five years.
Some high-quality pieces might even last longer—I’ve got a few spoons that have been with me for nearly a decade.
But how do you know when it’s time to say goodbye? Here are the warning signs I watch for:
1. Large cracks or splinters are deal-breakers.
Even tiny cracks can harbor bacteria and grow bigger over time. Microbes and bacteria can live in cracks, raising the risk of spreading germs, so don’t take chances here.
2. Persistent odor that won’t budge means the wood has absorbed something it can’t let go of.
I’ve tried everything—lemon, baking soda, vinegar—and sometimes an odor just won’t quit. When that happens, it’s time to move on.
3. Moldy patches that keep coming back are your cue to toss that utensil immediately.
If mold returns even after thorough cleaning and proper drying, the wood is compromised beyond repair.
4. Warping or flaking makes utensils unsafe and ineffective.
Warped spoons don’t sit flat in pans, and flaking wood can end up in your food—definitely not what you want.
The silver lining?
With proper care, your favorite wooden utensils will last for years to come, and when you do need to replace them, you’re just making room for new kitchen companions to love and care for.
Why Choose Wooden Utensils Over Metal or Plastic?
I’ll be honest—I wasn’t always a wooden utensil convert.
I used to think they were just trendy kitchen accessories. But after years of cooking and testing different materials, I’m completely sold on wood.
Here’s why they beat the competition hands down.
1. They’re ridiculously gentle on your cookware.
I can’t tell you how many non-stick pans I’ve ruined with metal utensils over the years.
Wooden utensils are kind to your pots and pans, preventing scratches that ruin surfaces and create places for bacteria to hide.
2. Heat resistance that actually works.
Ever grabbed a metal spoon that’s been sitting in a hot pan? Ouch.
Wood handles heat better and doesn’t become too hot in use, so you can stir away without burning your fingers or needing pot holders for everything.
3. They’re naturally antibacterial when cared for properly.
This blew my mind when I first learned it.
Wood has natural antimicrobial properties, and studies confirm that wooden cutting boards and wooden utensils harbor fewer bacteria over time than plastic alternatives.
When plastic gets knife scars, it becomes a breeding ground that even dishwashers can’t fully clean.
4. Better for the planet, hands down.
Their biodegradability and recyclability make them a more environmentally friendly choice, reducing their overall carbon footprint.
Unlike plastic utensils that’ll outlive us all in a landfill, wooden ones return to the earth when they’re done serving you.
The Environmental Protection Agency emphasizes the importance of choosing sustainable materials in our kitchens, and wooden utensils fit perfectly into that mindset.
They’re proof that sometimes the old ways really are the best ways.
Conclusion
Here’s the bottom line: caring for wooden utensils isn’t rocket science, but it does require a different approach.
Remember the golden rules—never dishwasher, never boiling water, always dry completely, and oil regularly with the right stuff.
Skip the olive oil mistakes I made early on.
Every time you choose that gentle lemon-and-baking-soda clean over harsh chemicals, you’re making a small but meaningful choice for your health and the planet.
These simple habits add up to years of beautiful, functional utensils that actually get better with age.
Your wooden spoons and spatulas have been quietly working hard for you—isn’t it time to return the favor?
Try this natural cleaning method today and extend the life of your wooden utensils.
Trust me, once you see how gorgeous they look after proper care, you’ll never go back to neglecting them.
Frequently Asked Questions
How often should I boil my wooden spoons?
Only when they need deep sanitizing—maybe once a month or after handling raw meat. Boiling too often can crack the wood. A gentle salt scrub works better for regular cleaning.
Do wooden utensils need to be oiled?
Yes! Oil them monthly with food-safe mineral oil or specialized wood conditioner. It keeps them from drying out and cracking. Think of it like moisturizing your skin.
How to make wooden spoons look new?
Sand lightly with fine-grit sandpaper, then oil thoroughly. For stubborn stains, try a baking soda paste first. Sometimes a little wear adds character though—embrace it!
Can you soak wooden spoons in vinegar?
Quick rinses are fine, but don’t soak them. Vinegar’s acidity can break down the wood fibers over time. Use it sparingly for deodorizing, then rinse immediately.
What is patina in wooden utensils?
That beautiful, darkened finish that develops with use and age. It’s completely normal and safe—it shows your utensils are well-loved! Don’t try to scrub it off.
- Why Wooden Utensils Need Special Care
- Products Needed for Cleaning
- Step-by-Step: How to Clean Wooden Kitchen Utensils Safely
- See It in Action
- Common Mistakes to Avoid
- How to Maintain and Store
- Bonus Tips for New Wooden Utensils
- When to Replace Your Wooden Utensils
- Why Choose Wooden Utensils Over Metal or Plastic?
- Conclusion
- Frequently Asked Questions
Find More Tips At:


